Servicing and Rebuild of MSR Standard Fuel Pump

Fuel Pump Maintenance & Rebuild

Required materials: MSR Whisperlite Expedition Stove Service Kit

Parts: Assembled PumpWL pump_parts overview_01

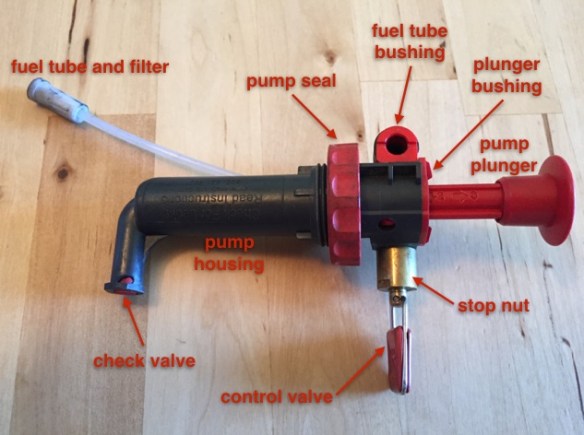
Parts: Disassembled PumpWL pump_parts overview_02

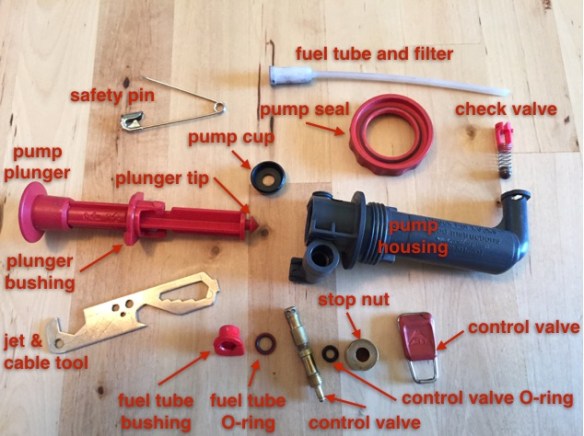
Lubricate the pump cup

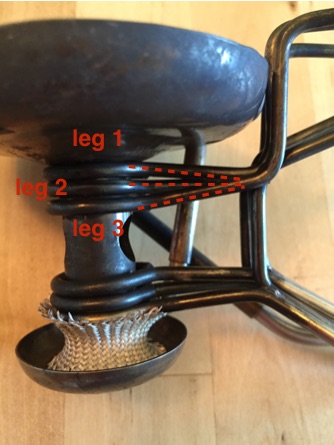
1)  Push plunger in halfway so that arrow 1 (printed on plunger shaft) is lined up with the plunger bushing

WL pump_plunger_01

2)  Twist the plunger counterclockwise (arrow 2) until you hear it click free

WL pump_plunger_02

3)  Pull out to remove the plunger (arrow 3)

4)  Remove pump cup and firmly press the new cup onto the plunger tip

5)  Rub MSR pump cup oil onto the pump cup

WL pump_pump cup_01

6)  Reinsert the plunger by holding the plunger shaft and align the top of the plunger bushing with arrow 1 on the plunger shaft

7)  Align the plunger bushing legs with the locking holes in the pump body

WL pump_plunger_05

8)  Push the plunger and plunger bushing into the pump body until the legs snap into the locking holes

WL pump_plunger_06


Replace the fuel tube O-ring

1)  Remove the plunger (see above)

2)  Using the jet & cable tool, rotate the fuel tube bushing counterclockwise and remove

3)  Remove the fuel tube o-ring using a safety pen (or the end of the fuel line)

WL pump_fuel tube_03

4)  Replace the o-ring and fuel tube bushing, and re-assemble


Replace the control valve O-ring

1)  Using the jet & cable tool, loosten the control valve stop nut

WL pump_control valve_01

2)  Unscrew and remove the control valve


3)  Replace the o-ring, and re-assemble the control valve


Replace the pump seal

1)  Remove the pump seal

WL pump_pump seal_01

2)  Replace the pump seal. Ensure that the pump seal seats properly over the rim on the pump body. Use a small amount of the pump cup oil to help seat the seal.


Clean and replace the check valve

1)  Turn the check valve counterclockwise and remove the check valve assembly

2)  Clean the cavity and seal of any debris

3)  Replace the check valve assembly


Replace the fuel tube and filter

1)  Pull fuel tube and filter out of the pump body

2)  Push new fuel tube into place firmly

WL pump_fuel tube_04


Replace the fuel bottle O-ring

1)  Remove and replace fuel bottle O-ring if damaged or worn

WL pump_bottle cap_01


Servicing and Rebuild of MSR Whisperlite International (pre-2012)

Stove Maintenance & Rebuild

Required materials: MSR Whisperlite Expedition Stove Service Kit

1)  Unscrew the priming cup and remove the priming wick.

2)  Remove the fuel line from the mixer tube.

3)  Remove the fuel line from the stove leg. With a little maneuvering the line is easily removed from the stove leg, no force needed. Take care to not bend the generator tube.

4)  Unscrew the jet using the jet & cable tool, and remove the shaker needle. Take care to not bend the generator tube.

5)  Pull the cable out of the fuel line using the jet & cable tool.

WL rebuild_fuel line_07.jpg

6)  Reinsert the cable and slide it back and forth inside the fuel line using short strokes (do this about 20 times). Remove the cable when done. This step loosens and debris that may be inside the fuel line.

7)  With the cable, jet, and shaker needle removed, insert the end of the fuel line into the pump and fuel bottle.

8)  Pressurize the fuel bottle with 10-15 pumps.

9)  Open the control valve fully and flush 1-2oz of fuel through the fuel line into an appropriate container (such as a second fuel bottle).

10)  Fully reinsert the cable into the fuel line. There will be about 1/2 inch of cable remaining out the end of the fuel line. Set the fuel line asside.

11)  Slide the stove legs down off the mixer tube / burner head assembly.

WL rebuild_stove breakaway_01

12)  Dissasemble the burner. Unscrew the top screw and separate the mixer tube from the burner. The burner separates into 9 pieces. Keep the pieces in order to make assembly easier.

13)  Whipe down each piece to clean away any loose material. Careful not to bend.

14)  Reassemble the burner making sure that the pieces go back together in the correct patern (Alternate crimped rings and flat rings to get a coregated structure). Snug down, but don’t fully tighten the screw at this point. The mixer tube will be oriented to the correct position when the fuel line is re-connected.

WL rebuild_burner_02

15)  Reposition the stove legs onto the mixer tube. ORDER MATTERS! See photo for correct assembly to have a level stove. Note the angle of the stove legs (leg 1 angles down, leg 2 is strait, leg 3 angles up).

WL rebuild_stove legs_01.jpg

16)  Replace the shaker needle and jet. Be sure to use the correct jet for your stove. The type is indicated on the side of the jet. For my stove, the jet type is IG or K.

WL rebuild_jet_03.jpg

17)  Feed the fuel line through the leg 2 and re-insert the generator tube into the burner and the jet into the mixing tube (reverse of step 3).

18)  Seat the fuel line / burner assembly into the correct position and tighten the burner screw.

19)  Replace the priming wick and priming cup.

20)  Fire up the stove and keep on cooking!

IMG_1909